First Build - 7-sound Nashville Tele

eLWOOD1776

Newbie
Messages
5
Hi all,

New to the forum and new to building, currently waiting for my Warmoth order to come in so I can get started. Build info below:

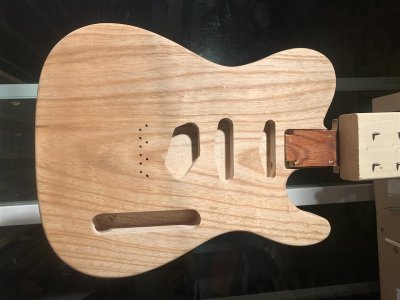
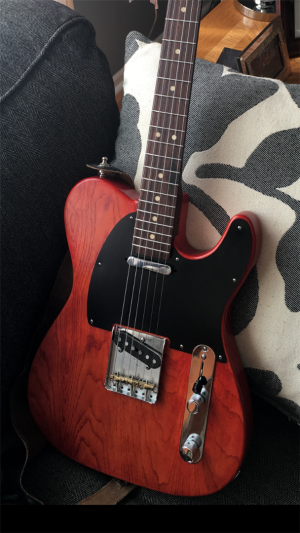
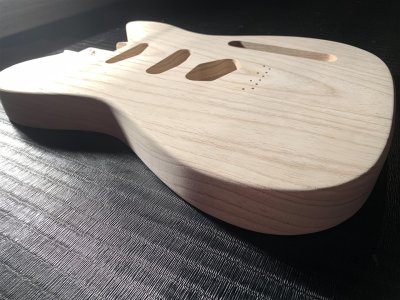
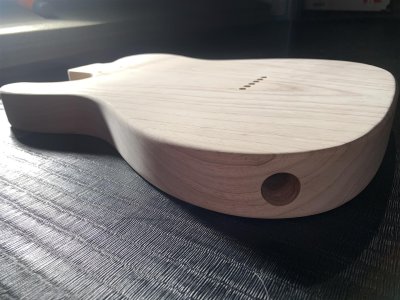
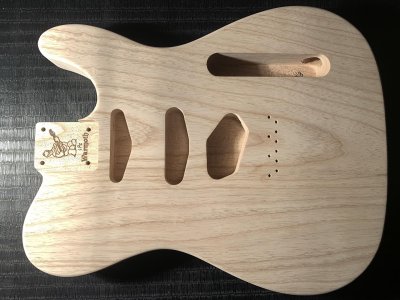
Body: One-piece swamp ash tele w/ middle strat pickup rout
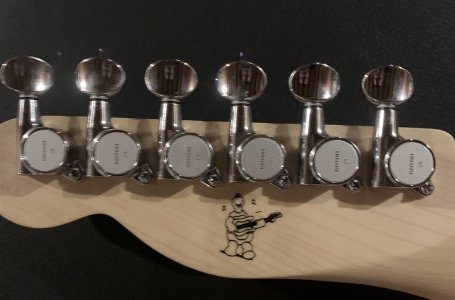
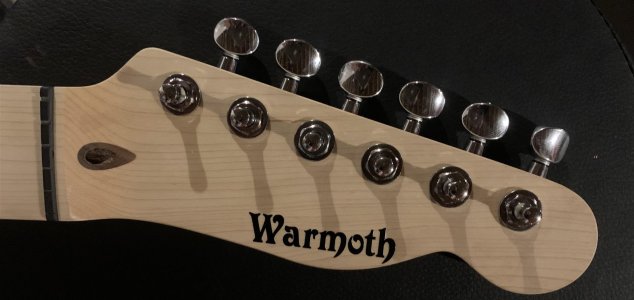
Neck: One-piece maple vintage/modern, standard thin, 25-1/2" scale, 1-3/4" graphtech black nut, 21 stainless 6150 frets, 10-16" compound radius, black dot side and face inlays, clear satin finish
Pickups: Vintage noiseless tele set w/ Seymour Duncan classic stack plus in between
Pickguard: matte black .09 w/ middle strat pickup
Bridge: Gotoh standard tele, chrome
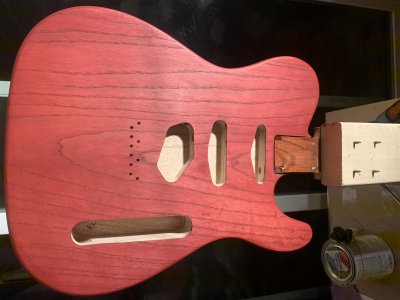
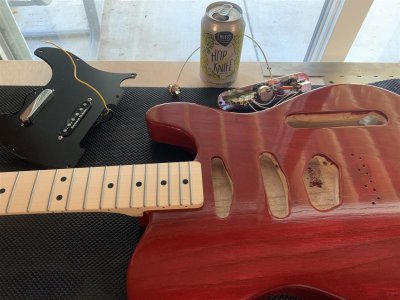
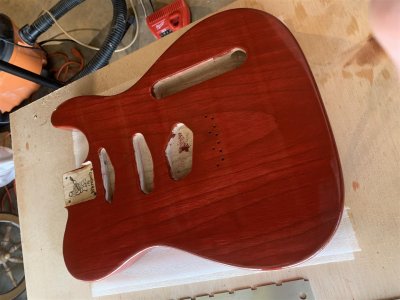
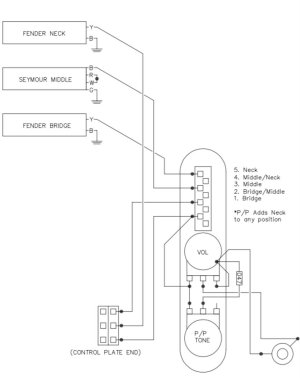
Misc: Electro socket jackplate w/ switchcraft jack, CTR 5-way switch w/ black tele switch knob, Bourns 500k pots w/ chrome vol and push-pull tone knobs, chrome control plate, chrome neck plate, Gotoh SG381 chrome tuners, black TUSQ XL string tee's, chrome planet waves strap buttons, chrome string ferrules. Will be wiring with a "neck-on" switch to get 7 sound options. Finish will be Varathane Barn Red stain with Tru-oil over top.

Can't wait to get started!
 
Welcome to the forum. Sounds like a fine plan. Looking forward to seeing your Tele come together.
 
Welcome to the forum ... post lots of pics of your progress.  I love the nashville teles!
 
Just got shipment notification from Warmoth! Should arrive early next week.

My wife and I are currently living with my in-laws while waiting for our new house to be built. Not only are they nice enough to let us live with them, but they also let me take over a portion of their unfinished basement. I set up a little workshop and built a little temporary workbench (It's a back killer!). The other pic is the finish that I'm going for. Although I never would have thought I'd go with red, I tried it out on a sample piece of ash, and I think it's going to look incredible.

Once the rest of the parts come in next week I'll finally be able to make some progress.

Mayfly said:
Cool!  :headbang:

Gonna put a B-Bender on that?  :)

Haha, I need to dip my toes in the water before going for a B-Bender install. Going to work my way towards building from scratch rather than assembling pre-made parts. So, maybe someday I'll do a B-Bender on a Body that I build from scratch.
 

Attachments

  • Temp Workbench.jpg
    Temp Workbench.jpg
    217.7 KB · Views: 13
  • Finish Example.png
    Finish Example.png
    1.5 MB · Views: 24
Love those Teles. That bench looks workable even if it isn't your favorite. I like that color sample.
 
Parts arrived on Monday! Very happy with the quality of everything that I got from Warmoth. Progress so far:
  • Tuners installed on the neck. Luckily I didn't break any of the screws thanks to tips I saw here. The only candle I had laying around was scented, so this tele will smell like lavender and vanilla  :headbanging:
  • Put the Warmoth decal on the headstock, unfortunately it's crooked because I was too excited to take my time.
  • Threw the turtle logo sticker on the back of the headstock.
  • Sanded the body down, even though it probably didn't even need it
Planning on starting the finish tonight with a coat of varathane pre-stain conditioner follower by barn red varathane stain.
 

Attachments

  • 2019-10-22 20.54.34 (Large).jpg
    2019-10-22 20.54.34 (Large).jpg
    280.9 KB · Views: 2
  • 2019-10-22 20.53.44 (Large).jpg
    2019-10-22 20.53.44 (Large).jpg
    226.5 KB · Views: 2
  • 2019-10-22 20.53.24 (Large).jpg
    2019-10-22 20.53.24 (Large).jpg
    268.1 KB · Views: 6
  • 2019-10-21 21.03.32 (Large).jpg
    2019-10-21 21.03.32 (Large).jpg
    136.3 KB · Views: 8
  • 2019-10-21 21.15.56-1 (Large).jpg
    2019-10-21 21.15.56-1 (Large).jpg
    167.9 KB · Views: 4
  • 2019-10-21 21.15.42-1 (Large).jpg
    2019-10-21 21.15.42-1 (Large).jpg
    171.2 KB · Views: 5
  • 2019-10-21 16.25.27-1 (Large).jpg
    2019-10-21 16.25.27-1 (Large).jpg
    220.4 KB · Views: 3
Congratulations, that's a beautiful body. It will look great with the barn red stain. Looking forward to your progress photos.
 
Got the first coat of barn red on last night. Started with a coat of varathane pre-stain conditioner. I didn't use conditioner on my sample pieces, and although the samples were too small to see any significant blotchy-ness, I think it made a big difference. At first, I was surprised at how much the conditioner changed the color, and I was nervous that it would affect the barn red. All worries went away after seeing the results of the first coat. It looks a lot like my samples did. After the second coat and a few layers of tru-oil, it really all starts to come together. Hopefully I can get the same results on the real thing. Second coat of barn red goes on tonight, and then it's time for tru-oil. I also peeled off the crooked Warmoth decal from the headstock. I decided to dive into the world of DIY waterslide decals for the front, and Warmoth will get their shoutout on the back of the headstock.
 

Attachments

  • 2019-10-23 18.49.18 (Large).jpg
    2019-10-23 18.49.18 (Large).jpg
    189.1 KB · Views: 4
  • 2019-10-23 19.08.26 (Large).jpg
    2019-10-23 19.08.26 (Large).jpg
    177 KB · Views: 11
Welcome to the forum, Brother. Sounds like a great project, keep them pics coming!

Rick said:
That's gonna look great.  Love the symmetry of the grain lines.
Yeah, right? That's some pretty balanced grain for a one piece. Gonna look exceptional with that finish!
 
The body is finished! I hit a few speed bumps along the way, but it's looking great. It's a little shinier than I wanted, but I like it.

After a few coats of tru-oil, I started wet-sanding the next coat with 800+ grain paper, increasing grain each time and waiting 24 hrs to dry for each. I did the same thing on my sample piece of ash, and it worked great. When I started wet-sanding the body, the stain started coming off. I didn't use much pressure when sanding, and I did everything the same way that I did on the sample. The only difference between my sample and the body was the pre-conditioner. If I did it all over again, I'd probably skip the pre-conditioner and just use a few more coats of stain for an even color.

I got everything wired up, other than the pickups. The fender noiseless tele neck pickup fit when I tried it on the unfinished body, but I didn't do the test fit with the pickguard. It won't lay flat with the pickguard. I need to break out the dremel and make some more room for the pickup so that it lays flat. After that, there won't be much left to do before I can string it up and play!

I didn't take a picture after I was done, but I got all of the pickguard/control plate screw holes drilled and installed, and also installed the jack plate. I still need to wire the pickups, install strap pins, install string ferrules, and add the custom headstock decal (see pic). Almost done!


Attachments

  • 2019-11-03 12.58.37 (Large).jpg
    2019-11-03 12.58.37 (Large).jpg
    232.5 KB · Views: 11
  • 2019-11-03 12.37.45 (Large).jpg
    2019-11-03 12.37.45 (Large).jpg
    227.5 KB · Views: 5
  • 2019-11-03 12.06.00 (Large).jpg
    2019-11-03 12.06.00 (Large).jpg
    181.2 KB · Views: 2
  • 2019-10-30 19.51.06 (Large).jpg
    2019-10-30 19.51.06 (Large).jpg
    177.1 KB · Views: 3
  • 2019-10-30 12.41.26 (Large).jpg
    2019-10-30 12.41.26 (Large).jpg
    51.7 KB · Views: 2
  • 2019-10-24 07.43.30 (Large).jpg
    2019-10-24 07.43.30 (Large).jpg
    48.6 KB · Views: 5
Back
Top