
Patrick from Davis
Hero Member
- Messages
- 2,197
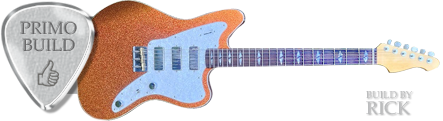
So, I have been working on the idea for a while now and have some info if any one would like to try this. Here is the picture:

Sorry it doesn't really show the dark streaking that the black dye left in the colored section. Here is the process
Black solvent dye powder from Reranch, about a teaspoon in a cup of denatured alcohol. Rubbed on with a ball of old t shirt. I cut a 2 inch by one foot strip and wad it up. Put that in a 6x6 inch or 8x8 inch square of t shirt and roll it into a cigar, then tie the two ends together. This will become completely soaked in the dye mix. Rub on the sanded quilt maple. Rub off with a paper towel after about 90 seconds, or when the alcohol starts to evaporate so that there is not much on top of the wood. Let is dry overnight/24 hours
Sand back, this will take a bit with the black. Repeat the dying process with reranch red, but at a tablespoon of dye per cup. The red needs a bit of dye or it looks pink. I applied it twice. I let it dry, but you could still smell the alcohol, and added a second layer. The red did not stain as aggressively. Wait a day for it to set.
Sand back, this went much faster. I left a section unsanded, other than to take the grain down, near the black. Dye with amber reranch powder. That is what is pictured. You could sand it back and go one last time with yellow, and it would have a better light dark dynamic, but I didn't order the yellow. It looked really light, and I already had three dyes. The amber has some red and black in it.
More thoughts on the process. You do not need to sand back the red much, the amber comes through it really well. You could sand only the middle of a guitar body to get a nice burst, and the alcohol dyes mix a bit. It is not very loose so it isn't a huge problem, but it does soften the edges. Watch out with the alcohol, it moves quite fast through the wood. I tried a first time with the red, but it was too dilute. I had wetted the surface with alcohol and the red turned pink and went through the 1/4 inch thick piece of maple in some spots. So, start dry and just hit it directly with the dye. It worked better for me. The pictures do not show the dynamics well. I have an older camera and those guys at Warmoth are good at picts. It looks like one of the fire burst finishes but not nearly as dynamic as theirs, more like the fire is still hot but later in the evening. The alcohol raises the grain a little bit. There is always some water along for the ride so I guess that does it. It sands back really fast with the sanding block. I got a test piece of quilt and would recommend getting some test pieces of wood. I got mine at a shop on eBay for 13 bucks. Shipping was about 12 bucks, but for 25 dollars total, not bad. I also have a spare piece for more dyeing fun. Can't wait to get the grain filling to the point where I am happy with it on the body, then I can try the process on it. Heh heh heh. Hope this has helped someone out there. Ask if you think I might be able to help or answer any questions all y'all might have.
Patrick

 With the LMII aniline dyes I get, the brown is like eight or ten times more "potent" by volume than the red, so a tiny little bit goes a long way. I do it by eye anyway - mix up a strong jar each of red, brown and amber, then do a mad-scientist mixing trip with a graduated eyedropper.