Custom pick guard project

Tom

Junior Member
Messages
48
Hi all - been a while since I was on the forum  :(

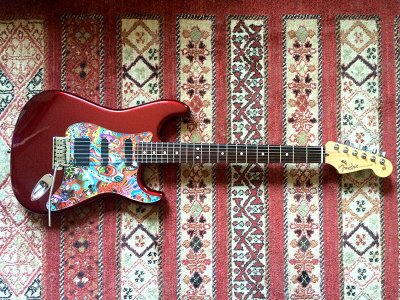
Thought I'd share a photo of this pick guard in progress. Just a crazy idea I had last night and it looks promising. This was  a psychedelic image I split across 2 sheets of water slide paper and applied to a basic white pick guard. The plan will be to clear coat over the coming days and then instal on the Strat.

If this works out, the process will enable application of any photo or image to a pick guard for little cost / work. Could be a cool way to pimp out an axe. I'll post a pic of the finished thing (assuming it all comes together) once done.

Cheers!
 

Attachments

  • IMG_0300.jpg
    IMG_0300.jpg
    190.3 KB · Views: 51
Cool idea!  I would think that the easiest way to do this would be to apply it to the back side of a clear guard, that way you wouldn't have to worry about the clearcoat.
 
Jesse said:
Cool idea!  I would think that the easiest way to do this would be to apply it to the back side of a clear guard, that way you wouldn't have to worry about the clearcoat.

Good idea Jesse, but you can't print the colour white on the water slide paper... the paper is clear and the laser printer prints white by not printing anything at all - it assumes the regular white paper will show through. So placing the image on the top of a white pick guard enables the white.

Although I've done head stalk decals with white or metallic ink by printing a mirror image of the decal (just the black outline with no white fill), then hand painting in the white or metallic part with a paint marker, then when you apply the decal, you flip the paper over and it looks awesome ... so now I'm thinking this through ... I believe you are onto something... I could make it work on the backside of a clear pick guard - it just needs to be done very differently. OK stay tuned - I'll try that. Thanks for the great comment.
 
No problem. Did not know that about water slides. Interesting.  You could always apply it and then spray it white behind that. My worry about having it on top would be durability in that area of the guitar.

Keep us posted!
 
Jesse said:
You could always apply it and then spray it white behind that.
[...]
Keep us posted!

I like this idea. To have the decal on the backside should also give the artwork some nice depth. Worth trying!
 
UPDATE - So after some thought and discussion, I thought the first and easiest step might be to just try and print the image on regular glossy photo paper and lay it behind a clear pick guard. If that didn't work I'd try the water slide paper and white paint. Anyway - here are a few pics of the finished project using the photo paper. I guess the good thing with this method is that I can easily change the image whenever I want.
 

Attachments

  • final_1.jpg
    final_1.jpg
    215 KB · Views: 36
  • final_2.jpg
    final_2.jpg
    233.1 KB · Views: 16
Tom said:
... I thought the first and easiest step might be to just try and print the image on regular glossy photo paper and lay it behind a clear pick guard. ...

Yea. Of course. So obvious, simple and brilliant genius.

Love the idea, and the result.

Cheers.

 
Looks like it came out great. What did you use to stick it to the back of the clear guard?
 
Jesse said:
Looks like it came out great. What did you use to stick it to the back of the clear guard?

I didn't use anything to stick it. I used an exacto knife to trace around the pick guard and cut the paper to size, including the holes for the pickups and knobs. Once you install the pickups etc, it is automatically held in place.
 
Interesting how shifting the image just a little bit changes the whole look. Quite a bit different from your first iteration...
 
Thanks for all the comments  :headbang:

Really happy with how this pickguard turned out ... here's a short little clip from today, the guard really does pop.

[youtube]5KLFjEf2dlY[/youtube]
 
Back
Top