1st soldering iron

pirate

Senior Member
Messages
335
Going to have my parts start arriving in the coming weeks for my first build and want to get my first soldering iron and practice to get comfortable before tele assembly. Any suggestions for a good quality first soldering iron that won't break the bank? Any other tips/advice about the soldering aspects of the build are welcome. My control plate will be assembled already, so just a matter of the connecting the PU's. Leaning towards the Twang Kings, although maybe a Chopper in the bridge, but haven't ruled out Fender vintage either, not sure yet. Thanks in advance!
 
There are a lotta irons out there. Myself, I prefer a simple "pencil" style iron like this Weller unit...
71077592.jpg

I'd normally recommend this American Beauty, but they're more for production use and so are kinda pricey. Last forever, though.

Those fancy units you see with the temperature controls and so on are a lotta gimcrackery designed to appeal to the geek in you, but don't have a lotta practical value. Their main utility usually is that they have a built-in stand, but you can buy nice stands fairly cheap.

About 40 watts is a good size. 25 watts pencil irons will sometimes let you down when you're trying to solder on larger parts, and anything larger than 40 is probably not designed for electrical as much as mechanical soldering. They'd be too hot, and you risk burning components up.

For solder, you want a rosin core type, and it should be what's referred to as "eutectic", which is a 63/37 alloy. It has the advantage of a somewhat lower melting point and a fairly narrow "plastic" state, which helps prevent cold solder joints.

For a tip, I'll just paste in what I just posted somewhere else, in order to make this a complete answer...

The choice of soldering iron tip can make a lotta difference results/performance. Unless you're soldering in small parts to PC boards or small lugs on mini-switches, usually a fine tip will give you trouble. The problem is they lose heat very quickly due to their low mass. That means if you touch one to a larger part (like a pot housing or spring claw), the part acts like a heat sink and the temperature drop at the tip is too much to heat up the part and/or maintain solder in a molten state. Often, you end up holding the soldering iron on the part much longer than you should, potentially damaging components.

On the other hand, a larger chisel tip can burn up parts or insulation very quickly, which is also NFG.

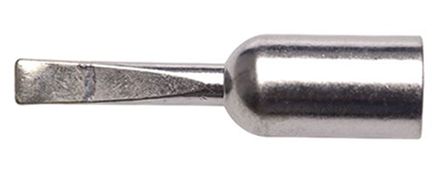
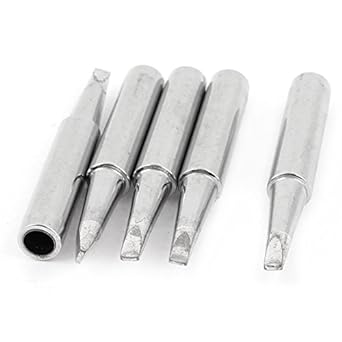
An effective compromise is a screwdriver tip, like one of these...
R8725132-01.jpg
24-6094-2.jpg
41f1IKBs3gL._SX342_.jpg
It's a good general-purpose tip that will work in a wide variety of situations.
 
I have always used Weller. My favorite one is one of those ones with a springy things that hold the iron and a place to put a wet sponge, it said radio shack on it but it was made by Weller.
 
Getting this one, then I want to practice before I do anything to the tele parts

https://www.amazon.com/Weller-WLC100-40-Watt-Soldering-Station/dp/B000AS28UC/ref=mp_s_a_1_6?ie=UTF8&qid=1547592779&sr=8-6&pi=AC_SX236_SY340_QL65&keywords=soldering+iron&dpPl=1&dpID=41ykAk%2BZOXL&ref=plSrch
 
Looks like it'll work. Got the right tip, too. Good luck on your practice!
 
pirate said:
Getting this one, then I want to practice before I do anything to the tele parts

https://www.amazon.com/Weller-WLC100-40-Watt-Soldering-Station/dp/B000AS28UC/ref=mp_s_a_1_6?ie=UTF8&qid=1547592779&sr=8-6&pi=AC_SX236_SY340_QL65&keywords=soldering+iron&dpPl=1&dpID=41ykAk%2BZOXL&ref=plSrch

That’s what I have. Been using it forever, it’s a great unit.
 
Ok another newbie question, which solder? There seem to be a lot of choices.
 
63/37 eutectic w/ rosin core, ~1mm dia.

But, if all you can find is 60/40, don't pass it up. The eutectic stuff is marginally better because it has a lower melting point and a narrower plastic state so your chances of making a cold solder joint are lower.
 
I can see I’ve been mis-informed! I was under the impression that the 63/37 was what I call “Chernobyl Solder”, the stuff your guitar comes wired from the factory with. The stuff that doesn’t melt at anything less than the temperature of a runaway fission reactor. But I guess that’s 53/47? I’m intrigued to try it now, anyhow. That said, I use the Kester 60/40 that Stew-Mac offers and find it to be very cooperative.

https://www.stewmac.com/Luthier_Tools/Tools_by_Job/Tools_for_Electronics_and_Pickups/Soldering/Kester_Pocket-Pak_Solder.html?utm_source=google&utm_medium=shopping&utm_campaign=2019-01-gp&gclid=EAIaIQobChMIyZO7lMH23wIV5x6tBh3xLgMcEAQYASABEgLEjvD_BwE

 
Silver solder requires a high temperature to work with, but I seriously doubt any guitar manufacturers are using it. Usually you only see it used for jewelry or electronics for super-picky applications like sensitive instrumentation or aerospace/military widgetry. More likely, at least on newer guitars, if you're having trouble melting the solder it's one of the "lead free" ROHS-compliant solders, which also require a higher temperature to melt.

60/40 is fine. People have been using it for millions of years. If that's what you have, there's no real reason to switch to 63/37 until you run out of 60/40.
 
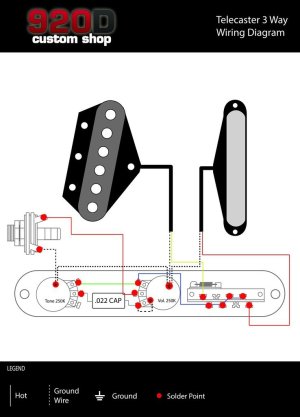
According to the diagram on their website, and since I have the prewired control plate from them, I will only have 3 solder points? All 3 ground wires twisted together at one point, and the 2 leads from the PU's? Or am I missing something? I figure I just need to solder 3 spots successfully for the darn guitar to work properly LOL

Which....I might add, is 3 more than I'm comfortable with  :laughing7:

https://920dcustom.com/pages/diagrams-telecaster-3-way
 
That's about it, although depending on the harness I suspect you'll also have to connect the output jack.
 
One additional note and newbie question...I plan on using copper tape to shield the cavities, but will I still need a ground wire for the bridge to the tape? It doesn't show this in any diagrams I see, or the one they provided that I linked to earlier.
Also, is there a preference for the 3 grounds to be soldered separately? Or can I twist all three together, solder together, and then solder to one point?
 

Attachments

  • Tele_3_Way_1024x1024_52e274ea-7914-4983-9d95-aacbf59e8a0a.jpg
    Tele_3_Way_1024x1024_52e274ea-7914-4983-9d95-aacbf59e8a0a.jpg
    73.5 KB · Views: 280
A good rule of thumb is anything metallic should be tied together. So, if you shield the cavities with copper tape, do run a gound wire to it. Also make sure all the pieces of tape and different cavities are grounding with each other.
 
Rgand said:
A good rule of thumb is anything metallic should be tied together. So, if you shield the cavities with copper tape, do run a gound wire to it. Also make sure all the pieces of tape and different cavities are grounding with each other.

Interesting thank you! I see videos of people putting tape in the cavities but I don’t see them grounding them to each other and only sometimes do I see someone ground the bottom of the bridge to the cavity below the bridge pick up.  I figured it must be due to a specific wiring schematic they were following where sometimes it’s necessary, sometimes it is not
 
The adhesive on the tape is conductive. Pretty much if the pieces overlap, they are making contact. I did one guitar with a separate cavity that I ran a fine grounding wire between them. I still checked them with a multi meter to make sure there weren't any ungrounded spots.

That said, Kevin (Cagey) says that if you use shielded wire on longer distances, you shouldn't need to shield the cavities. I don't use single coil pickups much so I can't say one way or the other how effective it is.
 
I'm trying Fender noiseless PU's in this 1st build (never tried noiseless) so still debating whether I will even use tape on this one. I suppose I can always take it apart and tape later if need be, and run some wire for grounding from cavity to cavity.
 
Cagey said:
There are a lotta irons out there. Myself, I prefer a simple "pencil" style iron like this Weller unit...
71077592.jpg

I'd normally recommend this American Beauty, but they're more for production use and so are kinda pricey. Last forever, though.

Those fancy units you see with the temperature controls and so on are a lotta gimcrackery designed to appeal to the geek in you, but don't have a lotta practical value. Their main utility usually is that they have a built-in stand, but you can buy nice stands fairly cheap.

About 40 watts is a good size. 25 watts pencil irons will sometimes let you down when you're trying to solder on larger parts, and anything larger than 40 is probably not designed for electrical as much as mechanical soldering. They'd be too hot, and you risk burning components up.

For solder, you want a rosin core type, and it should be what's referred to as "eutectic", which is a 63/37 alloy. It has the advantage of a somewhat lower melting point and a fairly narrow "plastic" state, which helps prevent cold solder joints.

For a tip, I'll just paste in what I just posted somewhere else, in order to make this a complete answer...

The choice of soldering iron tip can make a lotta difference results/performance. Unless you're soldering in small parts to PC boards or small lugs on mini-switches, usually a fine tip will give you trouble. The problem is they lose heat very quickly due to their low mass. That means if you touch one to a larger part (like a pot housing or spring claw), the part acts like a heat sink and the temperature drop at the tip is too much to heat up the part and/or maintain solder in a molten state. Often, you end up holding the soldering iron on the part much longer than you should, potentially damaging components.

On the other hand, a larger chisel tip can burn up parts or insulation very quickly, which is also NFG.

An effective compromise is a screwdriver tip, like one of these...
R8725132-01.jpg
24-6094-2.jpg
41f1IKBs3gL._SX342_.jpg
It's a good general-purpose tip that will work in a wide variety of situations.

+1 for this one. Same one I have
 
Back
Top