Warmoth Dyes, what do they use?

memecode

Newbie
Messages
22
I have a Warmoth Black Korina on Alder jassmaster body that I want to dye.
aPZCOGy.jpg


I'm interested in the type of dyes that Warmoth use. Does anyone know what brand?

Last night I had a crack at mixing up some Keda dyes, looking for something similar to Warmoth's Turquoise Dye. But my tests on various bits of random timber didn't yield results close enough to give me confidence. I used like 5 or 6:1 blue to yellow and mixture of hot water and isopropyl alcohol.

How close can I get to this:
TONsV4R.jpg


Edit: Fixed the image link...
 
The second picture is not visible. Edit: I see it now the link is fixed.

For dye advice perhaps take a look at the threads of docteurseb or perhaps he may comment here.
 
In my experience true dyes are hard to make look good on darker woods like mahogany and korina/limba because the lumber's natural color tends to muddy the dye's effect.  I found that making a stain using a universal pigment in a vehicle of 50:50 lacquer thinner/lacquer retarder worked well on my green mahogany telecaster.  Mixol Blue no. 9 pigment is a bright blue that leans toward teal/turquoise a little bit right out of the bottle, so adding a couple drops of and green and possibly white might get you there.  The stuff is also cheap, at about $6/vial.  A single vial mixed up as stain as described above can cover several bodies, so you can experiment a lot on scrap without worrying about using up all your product.


My experiments on mahogany with Transtint dye and Mixol pigment are here:
https://www.unofficialwarmoth.com/index.php?topic=16742.msg246207#msg246207


Second option, consider treating the wood with a pre-stain conditioner (essentially a dilute shellac or other clearcoat) to moderate the degree to which the stain will soak in, and then apply your dye.  This might allow the dye to "sit on top" rather than soak in.  My personal guess is this will not be substantially better than the result you're getting with dye applied directly to untreated lumber, but it might be a little less muddy.  Worth an experiment in any event.


Third, you could simply seal the body with an appropriate product, and then spray with a tinted clearcoat (known as a "toner" in the finishing industry).  To the extent your dye is compatible with a clearcoat such as dewaxed shellac or water-borne poly or acrylic, you could mix it up and apply it with a spraygun, airbrush, or Preval applicator.


That is a beautiful body you've selected there, so I recognize the fear of effing it up.  Practice a lot on scrap, and once you arrive at a finishing schedule that works, STICK TO IT.  Improvisation and shortcuts are the enemy of fine finishing.
 
Recounting an experience with wudtone and keda dyes.

https://www.unofficialwarmoth.com/index.php?topic=30424.15
 
Keda, TransTint, Fiebing's alcohol-based leather dyes are all great. I can't buy the latter since I live in CA but would love to try their turquoise one (hint ! hint !).

See my last two Soloist threads builds where I used Keda to stain the body. The 1st one also has couple Youtube videos from my channel showing the concentrations used for various color schemes:
https://www.unofficialwarmoth.com/index.php?topic=31846.0
https://www.unofficialwarmoth.com/index.php?topic=30158.0

There was this VIP build using Keda and done by a pro shop. I actually much prefer the above Soloist in dragon breath pattern as the colors are more vivid. It's not a Keda vs TransTint thing (Keda are in fact much more concentrated), it's just that I had complete control of the dye colors and pattern the dyes' color/intensity/pattern since I stained it myself:
https://www.unofficialwarmoth.com/index.php?topic=30366.0

And finally this one finished by Pat Wilkins, I'm not sure which brand he uses.
Honestly I don't think it matters much as you should be able to achieve most/any color with any brand, it's just that some already have dyes that may be close to the color you want:
https://www.unofficialwarmoth.com/index.php?topic=29581.0

I have a few notes as well somewhere for a PRS "black to grey fade" or "Frost Bite" finish you're into the gray/black finishes.
 
Couple things after reading your post.

It took me a while to get to get the dye concentration that work, and I nearly gave up early on.

The Transtint instructions were useless (way too diluted for staining a guitar top).
My recollection of Keda videos is that he too often seems to use mixes that are too diluted, which is why he often leaves a big pool of dye mix onto the wood until it penetrates. Note very practical on a guitar body that's curve (plus you don't want that stuff to drip elsewhere).
If you see PRS stain videos on YouTube they just do one pass and you immediately see the top taking a vivid color; to get that you need to increase the dye concentration.
I think it's just a difference approach between a piece of furniture where you want a more subtle color, and guitar where you usually want vibrant colors.

Keda dyes are much more concentrated, so if you see my videos on test pieces you'll probably want to use 1/2 or 2/3 the number of drops I had to use with TransTint.

I always used denatured alcohol to avoid raising the grain too much (unless I was doing a sandbank scheme calling for it) and warping the usually smaller pieces I was staining (backplates, truss rod covers). It's slow drying enough compared to isopropyl alcohol that I found it easy to work with.
It still raises the grain but TransTint has instructions for making a non grain raising mix (mixing with a bit of lacquer thinner if I recall).

As far as achieving the right color it's still very much a challenge for me once I deviate from basic colors.
Cyan/teal are particularly tough but I did get a light teal in this one:
[youtube]https://youtu.be/KGsX2Pzjhfw[/youtube]
That looks more like cyan in this video but that's because the white balance was cold.
In reality it became teal as soon as the clear epoxy was applied. The epoxy is completely clear with no yellowing, and I think the very slight natural yellow color of the wood was enough to shift it towards teal.

In your case the wood is dark and with an underlying color (alder in particular) so it may be hard to get the color you want (that 2nd picture doesn't show up for me either, the access is restricted).
 
Worth noting that drugstore alcohol is diluted with grain-raising water, so go with Everclear 190 (liquor-store ethanol at very high proof) or undiluted (200-proof) denatured ethanol (ethyl alcohol) or else methanol (methyl alchohol).  Denatured means the manufacturer spikes drinkable ethyl alcohol with methanol to render it undrinkable.  Taxes on drinkin' alcohol are, in most jurisdictions, much higher than on industrial alcohol, so denaturing it for industrial use saves a bundle.
 
Bagman67 said:
In my experience true dyes are hard to make look good on darker woods like mahogany and korina/limba because the lumber's natural color tends to muddy the dye's effect.  I found that making a stain using a universal pigment in a vehicle of 50:50 lacquer thinner/lacquer retarder worked well on my green mahogany telecaster.  Mixol Blue no. 9 pigment is a bright blue that leans toward teal/turquoise a little bit right out of the bottle, so adding a couple drops of and green and possibly white might get you there.  The stuff is also cheap, at about $6/vial.  A single vial mixed up as stain as described above can cover several bodies, so you can experiment a lot on scrap without worrying about using up all your product.


My experiments on mahogany with Transtint dye and Mixol pigment are here:
https://www.unofficialwarmoth.com/index.php?topic=16742.msg246207#msg246207

I've ordered some Mixol, Blue 9 and one of the greens. But a little unsure of the procedure to use it at this point. You mix it with lacquer thinner/lacquer retarder and then spray it on? Or wipe it on? And it then dries into the wood? What about the binding? Do I need to protect that? Or do I just scrape the colour off it?
 
memecode said:
Bagman67 said:
In my experience true dyes are hard to make look good on darker woods like mahogany and korina/limba because the lumber's natural color tends to muddy the dye's effect.  I found that making a stain using a universal pigment in a vehicle of 50:50 lacquer thinner/lacquer retarder worked well on my green mahogany telecaster.  Mixol Blue no. 9 pigment is a bright blue that leans toward teal/turquoise a little bit right out of the bottle, so adding a couple drops of and green and possibly white might get you there.  The stuff is also cheap, at about $6/vial.  A single vial mixed up as stain as described above can cover several bodies, so you can experiment a lot on scrap without worrying about using up all your product.


My experiments on mahogany with Transtint dye and Mixol pigment are here:
https://www.unofficialwarmoth.com/index.php?topic=16742.msg246207#msg246207

I've ordered some Mixol, Blue 9 and one of the greens. But a little unsure of the procedure to use it at this point. You mix it with lacquer thinner/lacquer retarder and then spray it on? Or wipe it on? And it then dries into the wood? What about the binding? Do I need to protect that? Or do I just scrape the colour off it?


Ah, sorry, I did not take binding into account.  DO NOT USE LACQUER THINNER. It will melt your binding, even if you mask it.  Seepage will make you swear a lot when you peel back the mask.  You should use alcohol as a vehicle rather than lacquer thinner.  The Mixol product is compatible with alcohol.


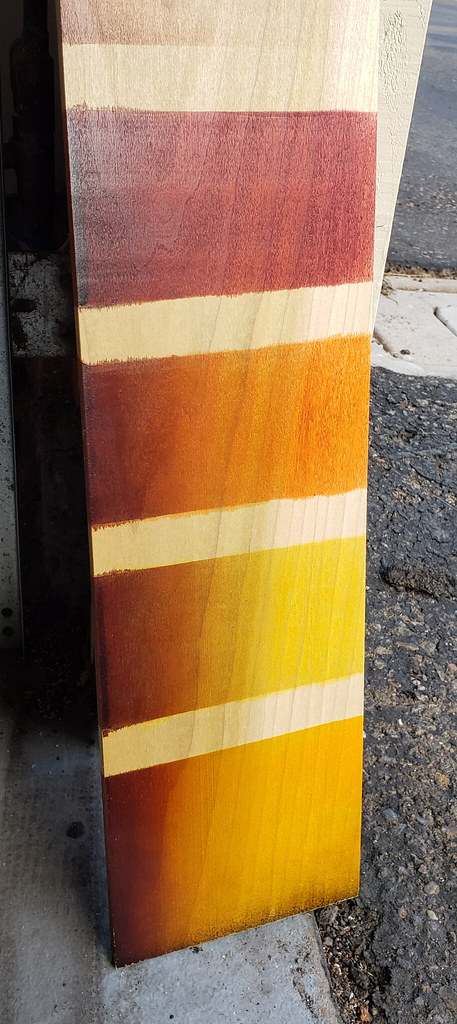
Your method for creating the stain is to squeeze a ML or so of pigment into a pint of vehicle (alcohol in this case).  For safety's sake, and for repeatability, measure how much you use.  Count the drops you squeeze into the alcohol.  Be stingy with it to start so you don't overpower the grain pattern that you hope to have show through the pigment.  You can always add more pigment.  I would take your scrap and tape off squares or stripes to compare various strengths or multiple applications, like so.  I mean, you can make whatever size divisions work for you, but make sure you write down what went on each one, and perhaps consider numbering the squares with a sharpie so you can keep track.


48751557308_0899c23188_b.jpg

In an abundance of caution, I would mask the binding with automotive detail tape.  An alcohol/pigment stain would likely not stain the binding, but why risk it?  Once you're done you can use a utility knife blade or single-edged razor to scrape if there is indeed staining.

To apply:  Take an old tshirt and cut out a rag about a foot square.  Wad it up and wrap the wad in another piece of the tshirt, which you will then tie off with a rubber band.  Result: A roughly spherical pad with a tail hanging off it.  The technical term for this object is a "tampon." 


Time to start applying stain now.  You don't want to pool it, just wipe it on.  On your scrap, you'll get an idea for how much you need in your tampon.  You'll want to wipe it on generously enough that you don't wind up with lap marks.  Work from wet into dry as you apply more.  Let it dry for an  hour to be on the safe side.  Pure alcohol boils off fast, but you might as well give it a little time to be sure.  Once it's dry, you're ready to proceed with sealing and topcoating.


Alternative method:


ALTERNATIVELY:  You can seal the unstained body with shellac, clear vinyl sealer, or untinted lacquer sprayed through a Preval unit or from a rattle can, then apply pigmented lacquer with the Preval.  Same story as the stain:  Track how much pigment you put in, test on scrap, yadda yadda.  Then top with clear lacquer via Preval, rattle-can, or spraygun.
 
Just realize the text formatting on the preceding post was all wacky. I have fixed the original post.  Carry on.
 
Good advice on taping the binding even if you "theoretically" don't need to, because it's PITA to get off.
 
I've found someone that'll sell me a block a Korina for testing, so when that and the mixol pigments arrive I'll do some tests and see what works for me. Thanks guys for all the notes.

Frustratingly the mixol vendor... the only one in the country is a foul mouthed angry person. I have concerns about it actually arriving.

I'm off to pick up some automotive masking tape today.
 
I hope you get your dyes without any problems.  I had good luck with the keda water based dyes, maybe not as good, but they work, and the Company is stellar with service.  You can ask them anything and they want to help you.
Cheers
 
If you tryna dye black korna to look like flame maple I got bad news for you son, those are two vurr (street for 'very') diff woods, lol.
 
BroccoliRob said:
If you tryna dye black korna to look like flame maple I got bad news for you son, those are two vurr (street for 'very') diff woods, lol.

Oh I'm fully aware of that. But I'm aiming for the general teal in the darker areas, maybe with some blue fade. What I'm expecting to happen is maybe something like this:
PT6255b.jpg


Mixol colours haven't arrived yet (*visible concern*). The little block of korina to test with arrived. And some more 3m masking tape for the binding is ordered and on it's way.
 
Uh, ok a update. I dyed the body yesterday and come bearing images.

I tried the get mixols and couldn't. And I couldn't get the colour I wanted by mixing up the Keda dyes. So I order some Lockwood dyes instead. It comes premixed to the right shade and was cheap enough. I mixed up a 1/4 of an once of dye into half a pint of hot water. It dissolved very quickly.

So the first step was a test:
BvjEYMT.jpg


Came out exactly how I wanted it. After that dried I decided to go all in and do the whole body:
o2xOwyG.jpg


This is it while still wet. Also very promising. I like that colour a lot.

Then the next day it dries to this:
1921pcb.jpg


Which is more blue than the test piece or the wet body. I feel it's lost the green tinge that I wanted. Fingers crossed I get some of that back after clear coating.

Speaking of which, I have 3 bottles of clear nitro and no idea what I'm doing. Do I need to put anything on it before hitting it with nitro? I'm aware I need appropriate mask. But haven't acquired said item just yet.
 
Looks mighty good. 


Next up is grain fill!  If you prefer a perfectly smooth sheen over the look of unfilled grain (pores very visible under clearcoat) I would hit that body with a coat of shellac (try zinsser rattle-can shellac, it's available everywhere) or a nitro or vinyl sanding sealer and then fill the grain.  It'll likely take a few rounds of filling before it's done.  You can use a black-tinted filler to make the grain look more pronounced or you can use a clear filler like Crystalac if you don't want that effect.  Or you can tint a neutral colored filler to match.  Count on needing to do 3 or more passes with the grain fill.  It's frustrating bit unavoidable,
 
Bagman67 said:
Next up is grain fill!

Well er, you see... I already did a grain fill step before I stained. It's smooth as glass right now, both on the front and back.
 
Well, then, you're way ahead of the game.


You can go straight to clear coats if you like.  Maybe a coat of sanding sealer or shellac to give you a little wiggle room when it comes time to wetsand the final finish.
 
Back
Top