The Sapele Saga Part 1.

PhilHill

Hero Member
Messages
1,653
Having recently acquired some nice chunks of Entandrophragma cylindricum, commonly known as Sapele, I thought I should make sure my tooling was in order. Cleaned and lubed the spindle sander, dusted out the planer and flipped the blades over to a fresh edge. And decided to recut the inner edges of my Tele hollow body template,

.
MSB8D5.jpg


. As I was setting this rigamarole up a thought struck me that I'm going to need to joint the pieces of new wood if I want to make a body out of it. Being that it's 8/4 size, (2 in thick) and I don't have a jointer yet some creativity was in order. So I took one of the planks and cut it into three sections and chose the two that matched up best. Then I set up the fence on the face of one near the edge and used the template bit to trim off a quarter inch deep cut on the side. Checked this and it was reasonably square to the face so I just kept going deeper down the side till I hit the limit of the bit. Flipped the piece over and used a trim bit with a bottom mounted bearing to do the second half. Boom,one jointed edge. Did the other board and they fit together well. So I glued them up and bandsawed a shape out of it.

.
c3gfJz.jpg


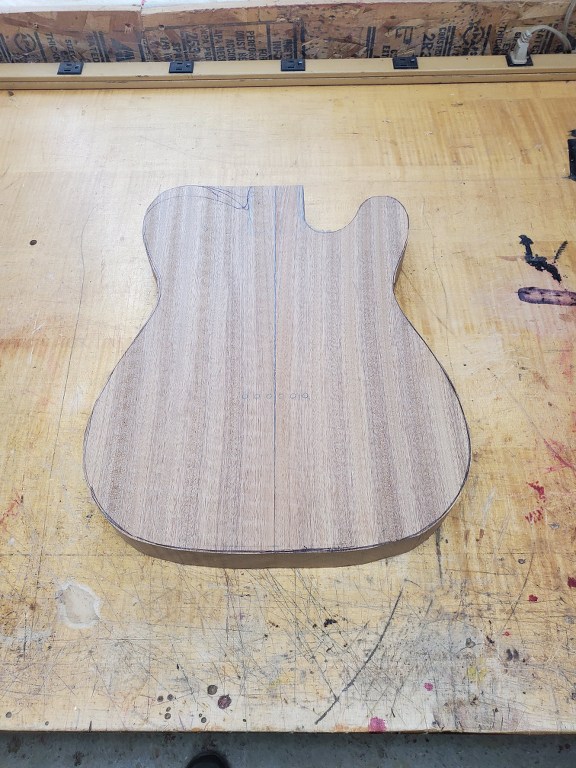
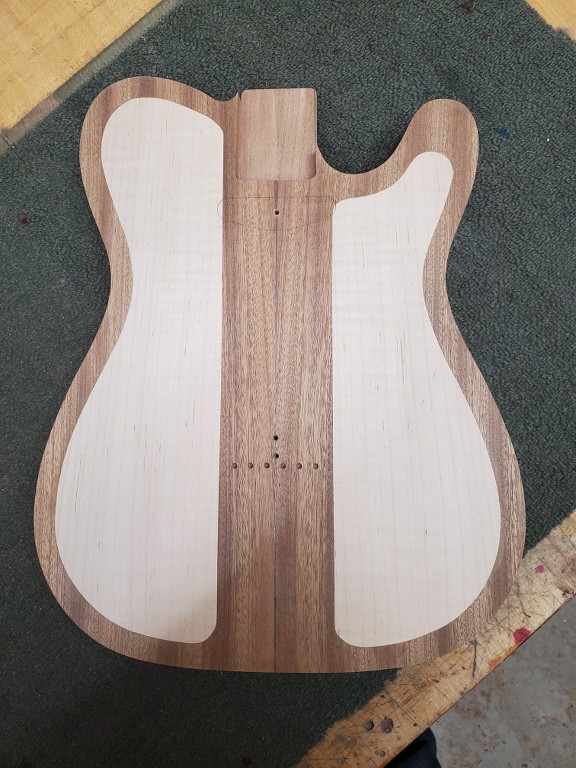
. The line down the middle is pencil denoting the center line. Took the rough shape and weighed it, came out to close to 7lbs. Ouch! Since I didn't want to make a Les Paul out of it, I decided some weight reduction was in order. So taking my newly refurbished template,  I proceeded to hollow away some of that poundage.

.
oVqZUw.jpg


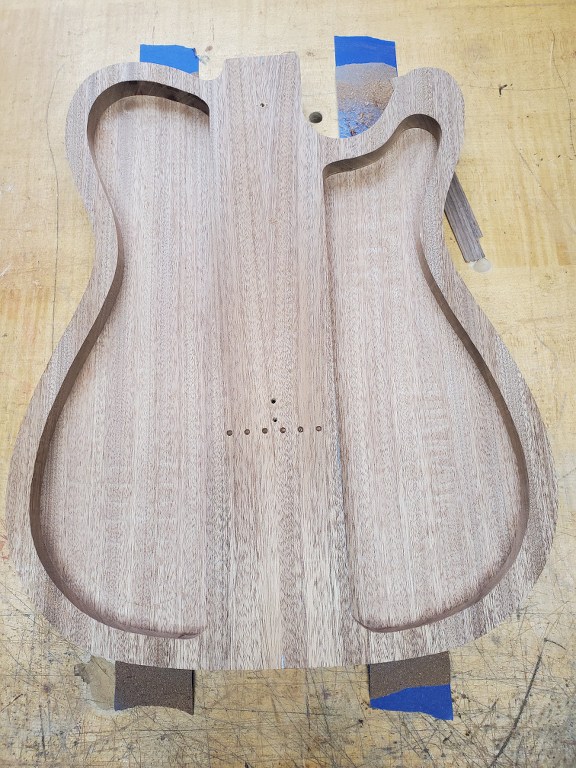
. Got it down to 4lbs 7oz. As I was thinking about what to do for a top, a thought struck me again. (Gotta figure out a better way, all this thought striking is giving me a concussion)
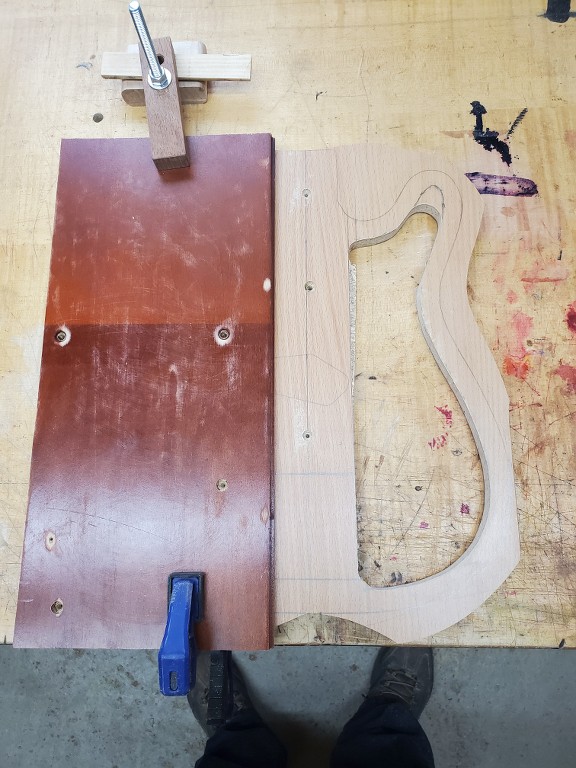
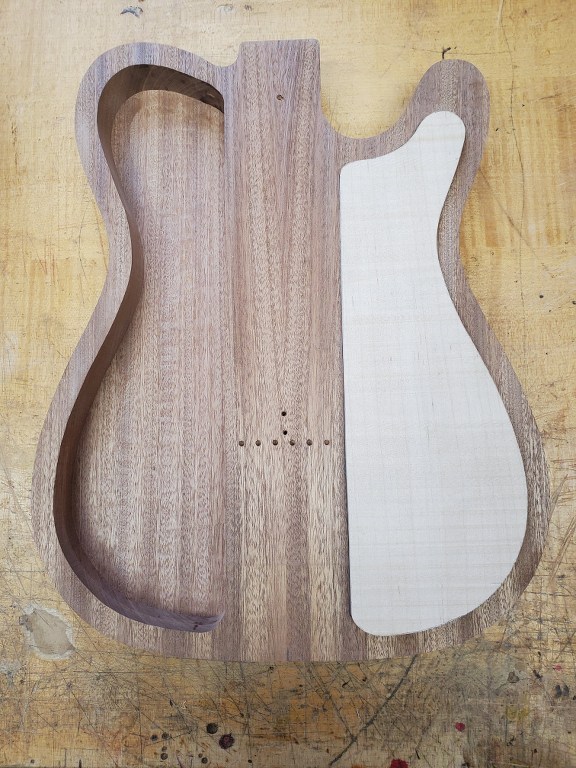
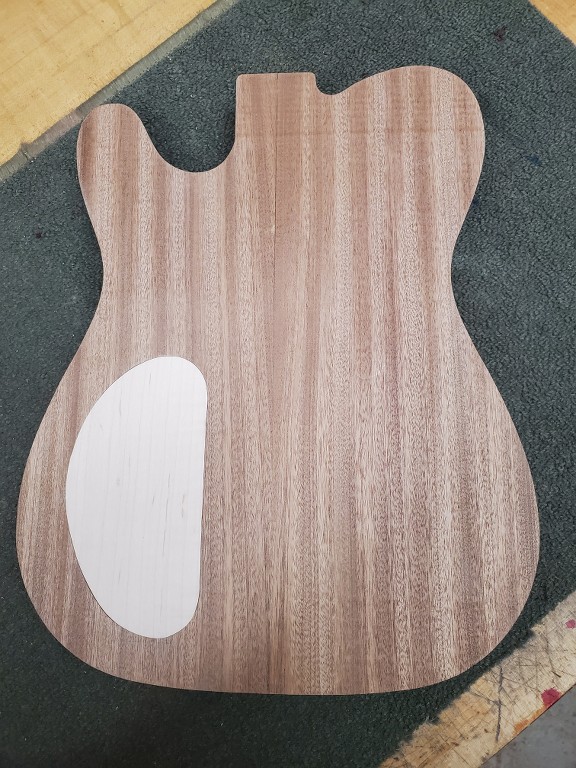
Why not put that template to another use. I have a couple of 4/4 pieces of flamed maple that were meant to be used to carve a small jazz guitar back out of. So I took one and re-sawed it down to get two 3/16 thick pieces. Then used the template to trace the inner perimeter onto the maple, a little sawing and spindle sanding later..

.
ffyk6R.jpg


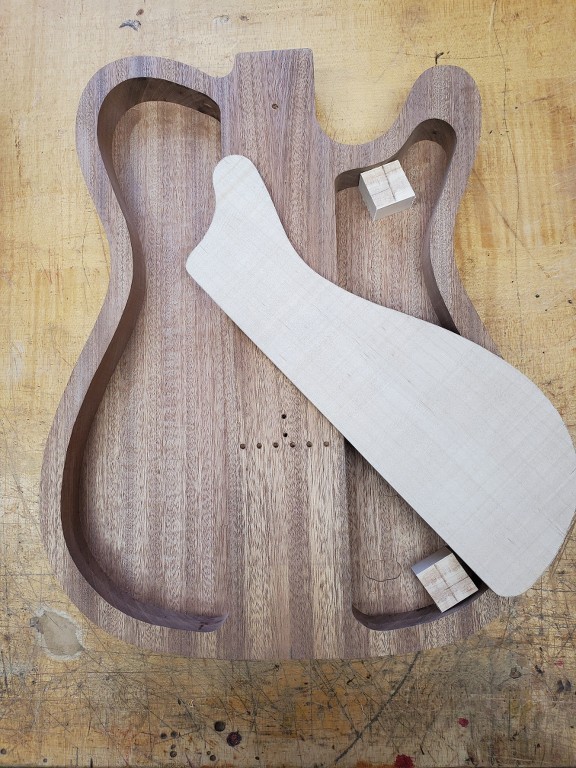
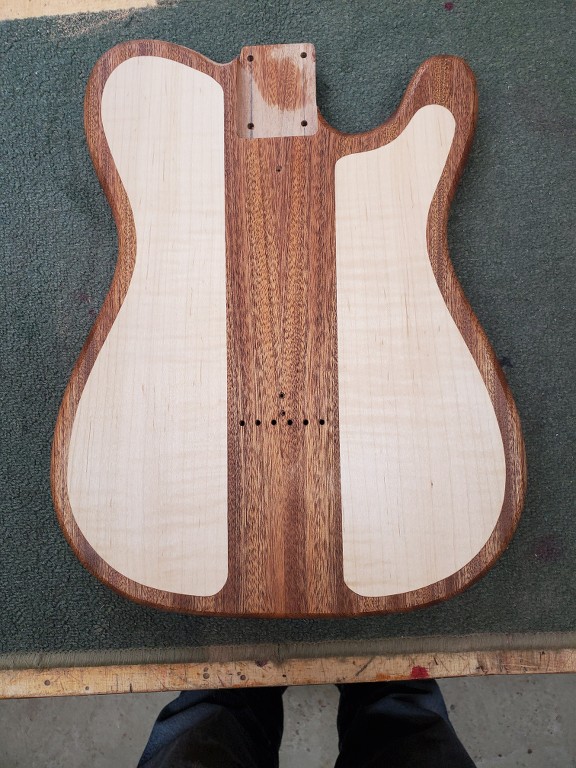
. Then put some support blocks underneath, then did the same to the other side. And glued them in place.

.
TPzD4f.jpg

.
2pQTis.jpg


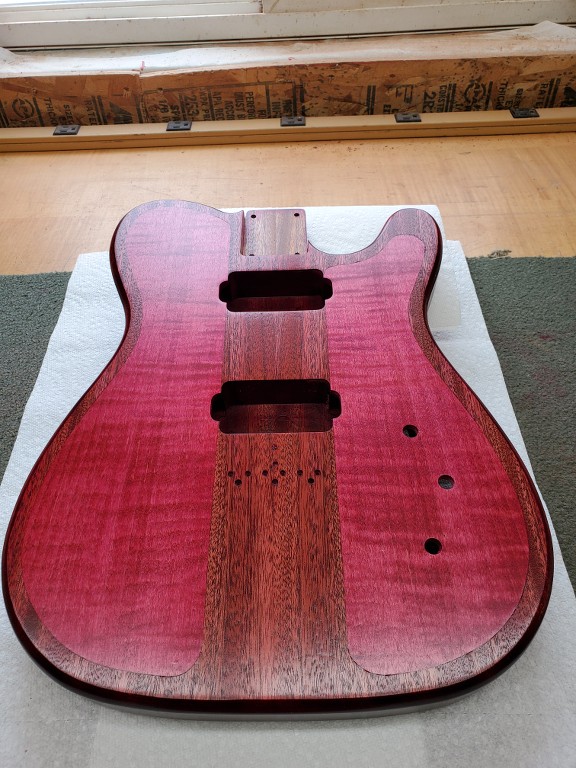
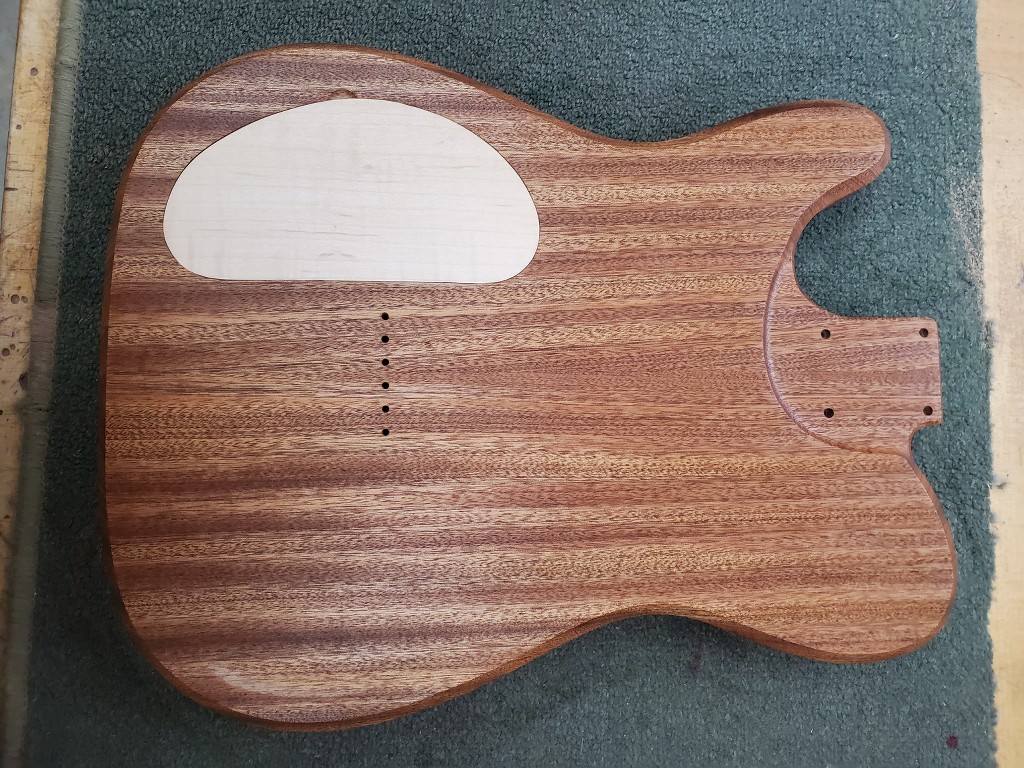
. Sanded them down to flush and went ahead and cut a neck pocket in it. Then flipped it over, made a control cavity and took some more of the maple and cut a cover for said cavity.

.
m1Odok.jpg


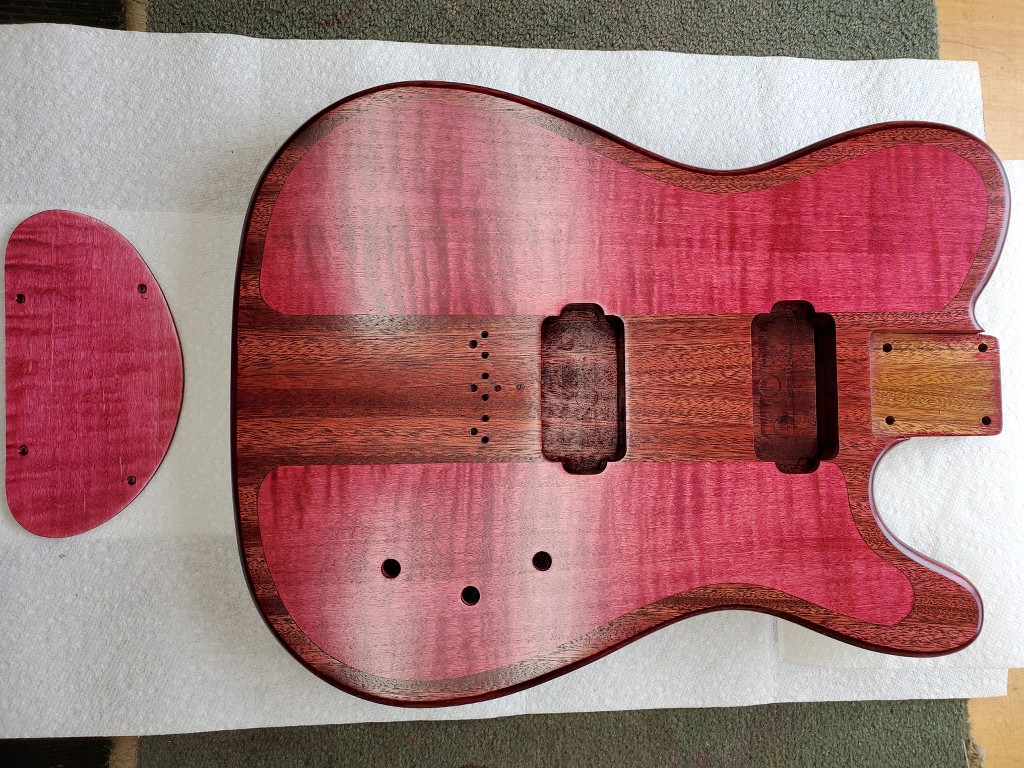
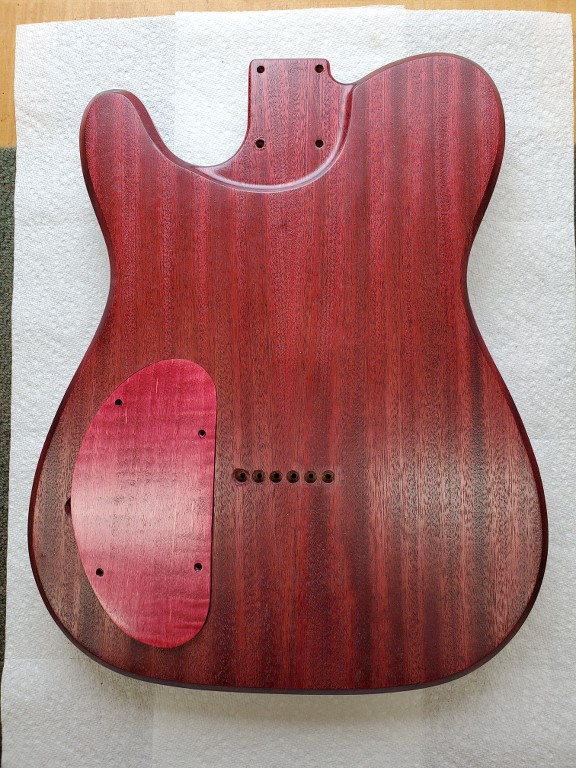
. Decided to chamfer the back edges and round over the front. Also I kinda contoured the neck heel a little. Then I stopped and put some naptha on it to see how things stand.

.
A200q7.jpg

 
vq9cNr.jpg


. Further developments to follow................. :headbang:
 
Mayfly said:
No freaking way! 

That's the coolest thing ever!

Well thank you very much. I'm happy with it so far, but I have to figure out what to do to bring out the flame in the maple some more. I have extra pieces of both woods so I'm gonna experiment a little with stains.  :icon_thumright:
 
Hmmm.  Might have been good to dye the maple before putting it in there.  Yea, would make sanding it flush a little tricky....

 
You could go old school on it. Torch the maple and sand back to bring out the flame.
 
Mayfly said:
Hmmm.  Might have been good to dye the maple before putting it in there.  Yea, would make sanding it flush a little tricky....

I thought of that, but I've had trouble before with the glue messing up the stain on the edges, and as you say it makes any further sanding tricky.
 
Phinox said:
You could go old school on it. Torch the maple and sand back to bring out the flame.

I'll have to think about that. I have done Shou Sugi Ban finishes before......... :headbang:
 
That's looking killer!  Love what you did with the front, very creative and cool.

Also love what you did with the heel contour.. Got me thinking now about doing something similar with my Sapele body instead of taking it down on the belt sander..  :kewlpics:

Looking forward to seeing how this one progresses..
 
Thanks War. I made a template for the Heel cut and then just used a round nose bit with a pilot bearing meant for cutting trays or bowls.  I'd like to find one that has a 45 angle like the chamfer bit. It's a pain trying to blend the concave edges into the beveled ones.... :headbang: 
 
DangerousR6 said:
That's is pretty durn cool, but i think you have "Project Finish Anxiety".... :laughing11:

  :laughing11: You might be right...........What I have actually is a bunch of bodies waiting till the conditions are right for finishing. Environmental conditions in my shop aren't the best for finishing right now, so they are all in project hold status till I can improve the temp and humidity, or find someone locally who can do it without it costing me $400. or more. Hopefully it won't be long before you all start seeing some complete guitars from me.......Really..........I'll get there...........Honest...........Their coming soon........................  :headbang:
 
PhilHill said:
DangerousR6 said:
That's is pretty durn cool, but i think you have "Project Finish Anxiety".... :laughing11:

  :laughing11: You might be right...........What I have actually is a bunch of bodies waiting till the conditions are right for finishing. Environmental conditions in my shop aren't the best for finishing right now, so they are all in project hold status till I can improve the temp and humidity, or find someone locally who can do it without it costing me $400. or more. Hopefully it won't be long before you all start seeing some complete guitars from me.......Really..........I'll get there...........Honest...........Their coming soon........................  :headbang:
R i i i i i i i ght....The first step to recovery is to admit you have a problem.... :toothy10:
 
I'm loving the whole thing from construction method to neck heel.  :icon_thumright: Have you considered finishing oil? I've seen oil used to pop the grain on flame maple and liked the result. Oil on Sapele also looked good.
 
JPOL007 said:
I'm loving the whole thing from construction method to neck heel.  :icon_thumright: Have you considered finishing oil? I've seen oil used to pop the grain on flame maple and liked the result. Oil on Sapele also looked good.

Thanks. Yes, oil is definitely on the list of possibilities.  :headbang:
 
Have I got this understood correctly?

You are going to inset the top veneer into the frame of the sides?

That is SO cool...

I noticed your original plan had a 2" thick body... If that is so take note of how much depth clearance you have inside the body now that you are placing the top veneer as an inset rather than sitting on top.

Depending upon the strength of that top veneer, I'd also look at taking the trouble to put a lip on the underside of the frame where the top will sit as you will be adding pots and switches and maybe plates.

I would also think it cool if you could somehow put a Firebird styled raised centre ridge...

This project has me excited...  :turtle:
 
Thanks for the suggestions. The hollowed-out sections are a shade over 1in deep and the maple sections are, still about .260 thick after sanding flush. I originally planned the sidewalls to be 5/8ths of an in thick. I've found that anything thinner than that leads to cracking in the future, especially with wood like this that's really close to quarter sawn. So, when I decided to inset the pieces into the cavities I had to go with internal support that I could add on rather than cutting a shelf into the sides as I didn't want to thin it out at that point. So I added blocks underneath at the edges and glued to them as well as gluing the outer sides of the maple to the inner side of the sapele. Kind of like the kerfing in an acoustic, just in short sections. I have already routed for the pickups and drilled for the pots and switch so I was able to measure top thickness at those points. I too would like the firebird type raised center, but I'm not sure I want thin the maple down anymore to achieve it.  :headbang:
 
I got to this point and decided to sit down and look at the whole body. The maple that I used for the inserts was taken from one side of a, more or less book-matched, set intended to be used to carve a back for a mid-sized jazz style hollow body. But it was on the clearance rack for a low price because it was 1A-2A at it's best points. It was never going to be PRS or Warmoth level flamey. So I felt that a totally clear finish wouldn't be the best way to go. Out came the dye, and as I really like red;

.
ijFD67.jpg


.
4qCrVD.jpg


.
e3pnB5.jpg


. It got a coat of dark red leather dye first then sanded it back. Then put a coat of highly thinned red, another of red with less thinner, and a final one of lightly thinned red dye. This was followed by three coats of satin lacquer. Now it sits to harden so I can do some level sanding and then final coats of satin. I prefer the look of satin myself, plus I don't have a good way of properly buffing out gloss. So there we go........................ :turtle: :turtle: :turtle:
 
Thanks really good looking.  Nice work on the body.    Are you going to keep going with the clear for a grain fill and high gloss?  That would look killer with a satin finish and black hardware.
 
DMRACO said:
Thanks really good looking.  Nice work on the body.    Are you going to keep going with the clear for a grain fill and high gloss?  That would look killer with a satin finish and black hardware.

You appear to have read my mind. That's exactly my plan so far. Satin finish and black hardware. With a Canary/Canary neck. ......... :icon_thumright:
 
PhilHill said:
DMRACO said:
Thanks really good looking.  Nice work on the body.    Are you going to keep going with the clear for a grain fill and high gloss?  That would look killer with a satin finish and black hardware.

You appear to have read my mind. That's exactly my plan so far. Satin finish and black hardware. With a Canary/Canary neck. ......... :icon_thumright:


Nice.  I have really fell in love with the satin finishes.  So easy too.  Canary will look good on that with some nice contrast.  IT you are not totally sold on a complete tele design a 3x3 Warmoth headstock would be killer. 
 
Back
Top