Stain tests for a future build

docteurseb

Hero Member
Messages
774
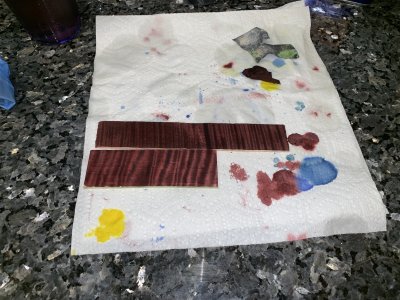
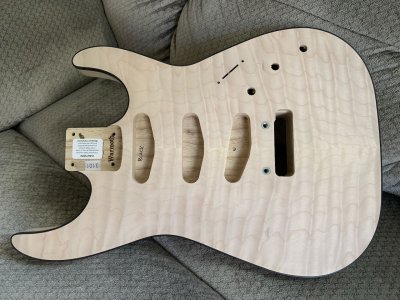
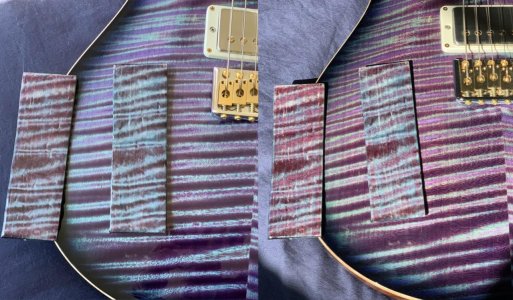
Had a bit of time to experiment with different color schemes on Sunday.

Test pieces were sanded to 180 grit.
The shorter piece is a very pale maple piece, while the longer one is darker.

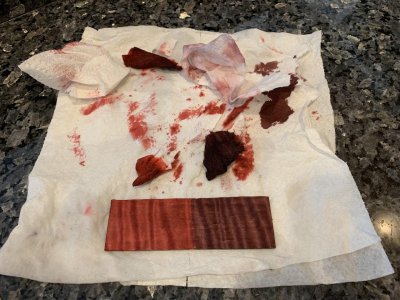
The base color was red mahogany Transtint with a few drops of black to make it even darker.
Sanded back to 180 grit.

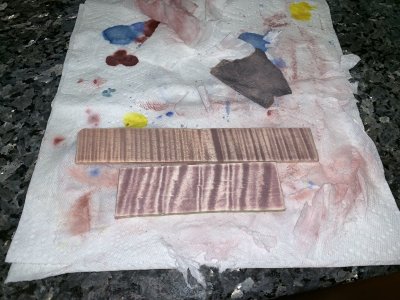
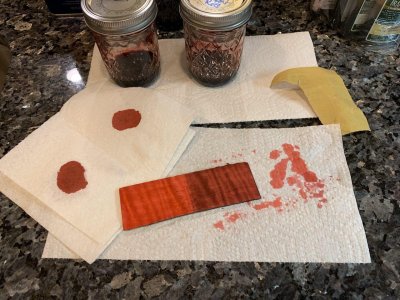
I tested two colors for the 2nd color:
- a relatively concentrated Blue dye.
- a much more diluted blue with a few drops of yellow. I didn't realize it was so close to teal until applying it (if you just look at the bottle it looks completely blue). Since that one was less concentrated I applied more coats than with the blue dye.

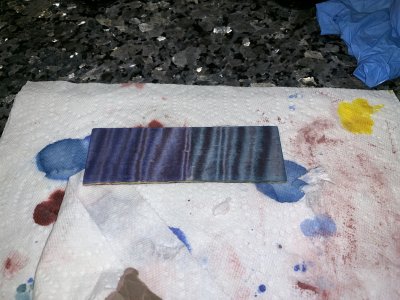
I applied some epoxy to get a quick idea of the final color once clear coated.

It's very interesting to see how much the darker piece of wood shifted colors and made them less vivid.

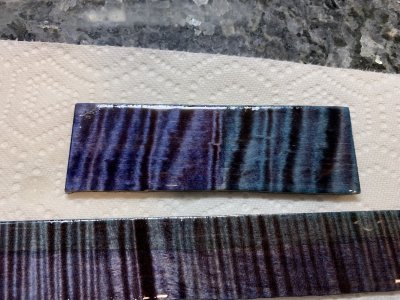
I kind of like the purple/blue one but would like better color separation.
The purple where the 1st+2nd colors mixed is a little too dark too, I may have to try with a more diluted red.
 

Attachments

  • stain1.JPG
    stain1.JPG
    677.2 KB · Views: 333
  • stain2.JPG
    stain2.JPG
    667.3 KB · Views: 306
  • stain3.JPG
    stain3.JPG
    620.1 KB · Views: 317
  • stain4.JPG
    stain4.JPG
    648.6 KB · Views: 377
That purple/blue sample looks good. Either color or a blend from one to the other would be outstanding.
 
The blue/violet reminds me somewhat of PRS' Aqua Violet, while the teal/purple combo is more like their Northern Lights scheme; they're just nowhere as good/impressive as PRS colors :laughing11:

I'd like to get a light cyan color to try this again, just not sure how to get there yet with the base Transtint colors I have (blue, red, yellow, orange, amber, black, mahogany)
 
For cyan, I'd try blue with just a drop or two of yellow in it. Not enough to turn it green but just tint the blue slightly in that direction. You may have to dilute the yellow a bit so you don't get too much.
 
Ah thanks, I definitely need to dilute then.
The teal color was from mixing 25 drops of blue and only 2-3 of yellow, and that already became teal....
 
I'm liking that sort of pinkish tone in the second picture, maybe with a nice bubinga or blood wood fret board to set it off...
 
And here's some wood porn we can all enjoy:
- Soloist: Warmoth w/ unique choice top, it's nice they upgraded the back to 1piece free of charge
I'd be tempted to do the same stain I did on my recent Soloist build hoping this time the top won't darken/yellow the stains as much as it did on the one one. I might test the back of the cavity to see how the maple look with the stain.

- Strat: USACG, bought completely on impulse this week-end since it was was heavily discounted ($240). There's the minor knot (not really an issue, especially with darker stains)  but the top really has a strong figuring and chatoyance.
There's no biding so it'll end up with an edge burst after I apply the stain, I might try doing a "wood accent binding" (what could go wrong ? ;-) ).

These two should keep me busy well into next year.
 

Attachments

  • soloist-quilt.jpg
    soloist-quilt.jpg
    210.7 KB · Views: 272
  • s-quilt.jpg
    s-quilt.jpg
    175.7 KB · Views: 236
I tried tweaking the red stain to see if I could make the purple a bit brighter once the teal is applied on top of it.
The prior red stain was:
stain #1:
- 25ml alcohol
- 25 drops of Mahogany Red
- 5 drops of black

I tried to brighten it up with:
stain #2:
- 25ml alcohol
- 25 drops of Bright Red
- 5 drops of black

stain #3:
- 25ml alcohol
- 25 drops of Bright Red


In pic1 the right side is stain #1, left side is #2.
In person the purple turns out to be slightly brighter with #2 but it's really subtle overall.

In pic2 stain #2 is on the right, #3 on the left. In person and on pictures I can't tell the difference.
There's more purple than in pic1 but I suspect I didn't sand back quite as aggressively.

Compared to PRS' northern lights (last pic) it's relatively similar, but nowhere as cool looking in person as the PRS finish. That said for a finish that uses only 2 layers instead of 5-7 for northern light, it's a decent approximation.
The initial stain (#1) is giving good results overall.

Anyhow, I don't think I'll be staining those bodies with any of these stains after all. I'm going to hit the pause button with builds and especially those with crazy figured tops; as Cagey said on one of my build threads one must be careful with very flashy/ornate builds as you tend to be worried playing them. I sure feel that way with the 3 guitars I did this past year, and I'll go back to a more basic Strat body with solid paint for the next build.
 

Attachments

  • pic1.jpg
    pic1.jpg
    209.2 KB · Views: 236
  • pic2.jpg
    pic2.jpg
    218.9 KB · Views: 260
  • comparison_nl.jpg
    comparison_nl.jpg
    194.3 KB · Views: 305
I like both colors in Pic #1. Either would be really nice. The colors in Pic #2 didn't look as elegant.
 
You know, they all look good. In the last pic, I like the ones on the right better.
 
Can't believe it's been that long already.
I eventually made couple truss rod covers for my PRS out of the purple+teal stain scheme which most closely approximates its Northern lights finish:

MyAME8a.jpg


But my TRC is darker and more red than the guitar's finish, while the teal is a little too light and too blue. In person though it looks pretty close.

Then decided to make matching backplates for that guitar and experimented again replicating the NL finish over the holidays.
I got somewhat close following some of the steps PRS shown here(starting at the 3:11 mark):
[youtube]https://youtu.be/j7FEJxQtJQA?t=191[/youtube]
Steps look like: hot pink, "heavy" sand back, hot pink, sand back, blue, green, blue.

Since it was impossible to really know how concentrated the last three colors were based on the video alone I simplified the last two steps using a teal:
- hot pink + sandbank. Keda liquid dyes ratio: 1/16 tsp (12 drops) red, 2-3 drops yellow,  2Tbsp+3tsp isopropyl 91% alcohol.
- hot pink + light sand back. Same color as above
- Blue. Keda liquid dye ratio: 1 Tbsp alcohol, 10 drops blue. I think this one should have been more concentrated (14-16 drops would probably be better).
- Teal. I forgot the exact blue vs yellow ratio (that depends of how green/blue you want it to be)except it wasn't concentrated enough and required either too many passes or letting a pool of the dye soak into the wood (not a good thing to do as it tends to eventually leave marks with the dye resurfacing). It was about 2Tbsp alcohol, 10 drops blue, 2 drops yellow. It should have been at least twice the amount of dye.

This gave me this:
https://www.flickr.com/gp/56248503@N08/11iT8o

Overall all the colors of NL are there, but it's just nowhere near as vivid.
With so many steps though it's a pain, time consuming, and very hard to get consistent results.

Then I found this approximating it in 2-steps:
https://imgur.com/gallery/IlmD58b

The first layer is key, if it's too purple/red then the 2nd layer will not make a bright purple out of it and it ends up looking like my initial attempt in this thread.
That makes sense as my initial tests in this thread all use a dark mahogany red or bright red, and that was definitely too red of a base. And the difference between too red or not is about couple too many drops of red out of a total of 20-ish drops.

The steps I used are:
- sand to 180-220 grit
- wet with water (opens up the grain).
- apply the purple/red stain. Keda liquid dyes ratio: 1Tbsp alcohol, 12 drops blue, 10 drops red. At first I used 12 drops bleu and 12 drops red and the final color was too red, I then tried 14 blue+10 red and that was a little too blue once mixed with the teal.
- Sand back with 220 grit
- Apply water (re-opens the grain). Without the final teal didn't look as vivid.
- Apply the teal. Keda liquid dyes ratio: 1Tbsp alcohol, 15 blue drops, 3 yellow drops

This is what I got and I like it enough to proceed with the backplates (it looks more pale on this picture than it does):
Ph8zjgq.jpg


I'm not quite ready to use that stain on a Warmoth body, I need more practice to get a consistent/repeatable color (if you apply too much teal you could loose that purple quickly as it could turn blue/teal, and if you don't put enough then purple will be too reddish).

Anyhow this is fairly fun, just hadn't much time since September to try it until now.
 
Back
Top