Smoke Burst Finish on Roasted Swamp Ash

al5

Newbie
Messages
5
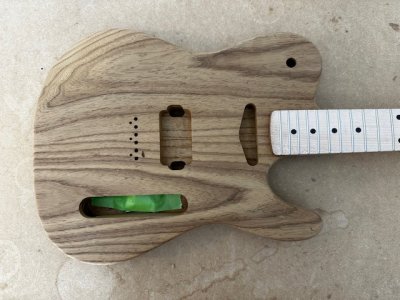
I am embarking on my first build - a 7/8 Tele with a 24” scale Strat neck. The body is roasted swamp ash:
1709694066922.jpeg
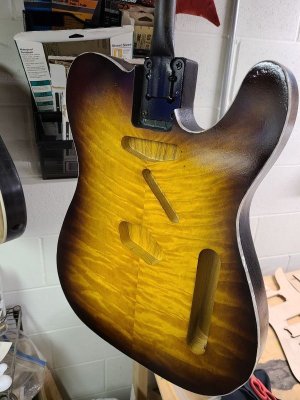
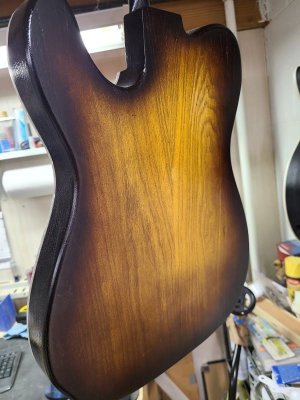
I have a good amount of woodworking experience, but not much in the way of finishing (unless you count wood floors and simple stain and poly projects). I’d like to go for a finish that resembles this:
I guess that’s a smoke burst, more of a two-toned burst. My question is, what colors would you use to achieve this? I’m planning to use ColorTone spray cans and finish with satin clear. I think the tricky part is that the body is already a bit darker, given the roasting. The guitar in that video is also roasted and the description says it’s a natural center with black burst. So maybe the ColorTone Sunburst Black and Satin Clear center? Maybe fade in with a bit of Tobacco Brown? Thanks for any advice. I’m excited to get started, just want to make sure I have a sound plan.
 
Can you clarify, please?
- a 7/8 Tele with a 24” scale Strat neck.
I assume this is a Mustang/Jaguar neck.

The body in the video also looks as though it may have been dyed and sanded back before the spray coats. Also of coarse it has a flame maple top versus the swamp ash of your body. Getting a similar result on ash may be a challenge.

See brown dye for example at the link below. Or the bursts have the option to see examples over Swamp Ash.


If you can get some scrap wood to test your finish on before applying to the body.
 
Cool project! Roasted swamp ash gets pretty brown under finish, so your plan of sunburst black for the burst and clear all over sounds like a good one. I don't think the tobacco brown will be needed unless you want to do a black-to-brown-to-clear burst.
Like Stratamania said, test test test. Oh and grain fill first if that isn't obvious.

Also from personal experience, if you're shooting your finish outdoors, make sure that the humidity is not too high. If you live in a humid place (like I do), definitely invest in a hygrometer.
 
Not precisely the same color you're going for, but an example of the ColorTone black to tobacco brown to vintage amber burst before the final clear coats and polish. I used the instructions on StewMac for applying the burst.

Notes about this build: probably the 4th Tele body I cut. 2nd time applying a veneer/lam top. 2nd time adding a binding. 1st time doing a burst finish. I like it, but I know where and what to improve. 😉

2023-12-29 20.54.29 - 600.jpg


2023-12-29 20.54.57 - 600.jpg
 
LOL Rag. Everyone thinks they live in a humid area till they take a walk at sunrise in FL. Walking out the door you start sweating. LOL.

Truth. I was at a week-long conference in Orlando last summer. I was drenched just walking the quarter mile to a restaurant for dinner...which had the AC blowing so hard that I was freezing sitting at the bar! Then later that week, I went for a 2 mile run. That was definitely harder than I expected for 2 miles.
 
Can you clarify, please?

I assume this is a Mustang/Jaguar neck.

The body in the video also looks as though it may have been dyed and sanded back before the spray coats. Also of coarse it has a flame maple top versus the swamp ash of your body. Getting a similar result on ash may be a challenge.

See brown dye for example at the link below. Or the bursts have the option to see examples over Swamp Ash.


If you can get some scrap wood to test your finish on before applying to the body.
Yes, sorry, I was thinking of the neck pocket style - it is a Jag/Mustang neck.

I wish I’d thought to ask Warmoth to include some cutoff scraps of roasted swamp ash to test with. Not sure if that was a possibility, but wouldn’t have hurt to ask. I wonder if I could somehow roast some ash I have and if that would get me a close approximation to test with. It’s been aging for 10+ years.
 
Not precisely the same color you're going for, but an example of the ColorTone black to tobacco brown to vintage amber burst before the final clear coats and polish. I used the instructions on StewMac for applying the burst.

Notes about this build: probably the 4th Tele body I cut. 2nd time applying a veneer/lam top. 2nd time adding a binding. 1st time doing a burst finish. I like it, but I know where and what to improve. 😉

View attachment 61362


View attachment 61363
Nice work! Is that Pearloid binding?

Where did you get the metal neck pocket holder doo-dad (I’m sure there’s a name for it that I don’t know 😁)
 
Last edited:
Cool project! Roasted swamp ash gets pretty brown under finish, so your plan of sunburst black for the burst and clear all over sounds like a good one. I don't think the tobacco brown will be needed unless you want to do a black-to-brown-to-clear burst.
Like Stratamania said, test test test. Oh and grain fill first if that isn't obvious.

Also from personal experience, if you're shooting your finish outdoors, make sure that the humidity is not too high. If you live in a humid place (like I do), definitely invest in a hygrometer.
The grain filling and sealing is what I have been reading/watching about recently. I have read good things about using Z-Poxy (for clear grain filling) and tinted (like the Good Filla stuff). The latter if I want to accentuate the grain more. But the first question is seal or fill first? Right now I’m in the seal then fill camp, but interested in what others have to say on the topic.

I’m in the northeast. I’m hoping to do the prep work in the next month or so and then paint in the shed when we start hitting 65 / 70 degrees.
 
Not precisely the same color you're going for, but an example of the ColorTone black to tobacco brown to vintage amber burst before the final clear coats and polish. I used the instructions on StewMac for applying the burst.

Notes about this build: probably the 4th Tele body I cut. 2nd time applying a veneer/lam top. 2nd time adding a binding. 1st time doing a burst finish. I like it, but I know where and what to improve. 😉

View attachment 61362


View attachment 61363
Another top loader?
 
Hey, Al5 - welcome to the forums and we are happy to have you.

The photo below is of a non-warmoth western red cedar I hit with Behlen solar-lux lemon yellow stain applied with a rag. As you can see, it ain't all that yellow. I stopped after two applications because it was the color I wanted.

I then sealed the body with Zinsser rattle can clear shellac and then sprayed a burst with Mohawk (formerly branded as Behlen) guitar lacquer in Encore Brown. I used a telecaster-shaped silhouette I cut out of poster board that I then perched on the body to ensure a fairly clean and even burst line. Clearcoat was about 574 applications of Mohawk rattle-can gloss lacquer. I let it hang for about six weeks because I am very poor at pushing projects through; and then I wet-sanded through the grits from 600 up to 1200 using ordinary automotive wet-or-dry paper; and then from 1500 to 12000 Micro Mesh fabric on a stiff foam block. I used water with a drop or two of dishwashing soap as the lubricant (but many folks are quite successful sanding dry, and I understand Warmoth dry-sands their finished bodies before final buffing). Finally, I hand-buffed with Maguiar's Mirror Glaze and a microfiber cloth.

As noted, the roasted ash does get dark under a clearcoat, so you might also look into a pigment stain or yellow/amber toner, rather than a dye, which will just soak in and be overpowered by the wood's naturally dark color. As a practical matter, I suspect a brown burst would hardly show against the swamp ash, so I join everyone in supporting a black edge burst

AP1GczPncZx7xEqxkEIc7WvNt5liWxF_s18-XWg_dmnRuDzrQRR1knSKnVa55HrSF7ymOppfbJjkyk-KgLY5NQtk_8oP9BvFGx-whkuqNIhRuf7acwN6zYrdHwUBZYdWc-4v7KhMd1cgosLQnVgKefC5CRGs17oGah-1FZwu-eB_aosAnc7ivBHjHo6gIIFwTzIjzuayL0H5qGfMe_myxYtk67DRXpSgd8fwCuENdewWNYWvaA966gh95P1dja75EGbk6x9AZWyZLySAV12gvyYMVnNivgXRd3ZIRqFs-SuGgcKCLs4VN03k_pQMe8rvRqDvyqnz7qXMmb6lETxQgfABimvF38T_FGh9WJiiI8A8D52pKc1eckpM9oLVwIKhDlC1rskjN3pHrAEQ_mhWeOqo7KeLcham5X89kGQIMlDgoPw6E173a8Wbw-OUUezVu_985B_kHxjI7ixipLH6I2ibyVmbUv-SODA58Kcc2VPiq678etsKmwBmrG3LMBwWdbRhLr7-Ygv-1zLbIwZQzCrwlHRBLOpdyU2lTQZ1ytjJe9qLN7XNnvaDp4W3jWqcQBnB1QAzgP2UkTzJEAf_faMu_9pbDnQeJVwKWKBku3W2R29k6YF9LkdnOTtIIqgK-RaZFC_UC18qC4pMg-dpfjoDKUEP7pqibzBuiDYfg7Wam2BjjB0KxFVrk9TYSNlUjbsGa13xAVFvtD8hROaef7p7plIk4xDYlcGoRyizEjt6V-llg3Ts0rZUV5pKfnX2oJvmnhVA7AErqr4c0kw-0Qjv2WMFxFoXQc3z5wGs93g4-2kXK4UryL1o7F0SJWW7DDzpW8owyMInRsqaVvrqcfk3ftC0lonLxkRi3h4gCHPzXw5BGFkxxtCk3F-NR2dodvtjC203w3oVpeJ29GE=w689-h919-s-no-gm


For supplies, if you are in the USA, I have had good luck ordering from Shellac.net.

Scroll down to this item:
M102-0420 - Aerosol, B101-0800 CLEAR Lacquer, GLOSS

A Micro Mesh fabric kit that includes an appropriate block is available here:

You can also get small Micro Mesh pads from Stewart McDonald, but they are only 2x2 inches, since they're marketed as a fret polishing solution. They'd likely be rather inconvenient for handling a whole guitar body.
 
The grain filling and sealing is what I have been reading/watching about recently. I have read good things about using Z-Poxy (for clear grain filling) and tinted (like the Good Filla stuff). The latter if I want to accentuate the grain more. But the first question is seal or fill first? Right now I’m in the seal then fill camp, but interested in what others have to say on the topic.

I’m in the northeast. I’m hoping to do the prep work in the next month or so and then paint in the shed when we start hitting 65 / 70 degrees.

If you're using a tinted filler to enhance the grain's contrast, apply sealer first so the pigment in the filler does not bleed into the wood surface. More generally, I find that grain filling works better for me when I seal with shellac first; but you could go either way with a clear filler like Aqua Coat.

Z-poxy can impart a faint yellow/amber cast to light colored woods, but will probably have a negligible effect on the color of the roasted ash.
 
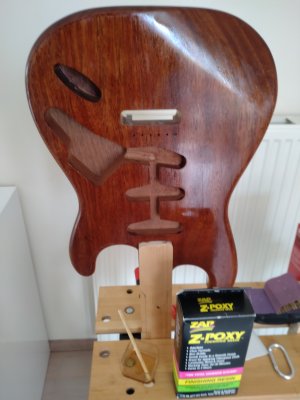
Regarding Z-Poxy, here is a pic of a mahogany body I used it on last summer. This was, I think, just after the second or possibly third application. You can see the colour difference to the natural wood colour in the cavities. This was used to both seal and fill the grain. Subsequently, I went to primer and colour coats.

1709754815386.jpeg
 
Nice work! Is that Pearloid binding?

Where did you get the metal neck pocket holder doo-dad (I’m sure there’s a name for it that I don’t know 😁)
Yes, it's pearloid. Got a 5-pack from AMZ. Still learning, so I still have some gaps but definitely better than my first attempt. ;)

The metal doo-dad is part of the Freehand from Stewmac.
 
Back
Top