You are using an out of date browser. It may not display this or other websites correctly.
You should upgrade or use an alternative browser.
You should upgrade or use an alternative browser.
Grain Fillers...for Alder and Mahogany
- Thread starter JPOL007
- Start date
Cagey
Mythical Status
- Messages
- 24,425
I've not seen one that is wood-specific, and few of them shrink any appreciable amount these days. It's not like wood filler or wall spackling - the voids grain filler is designed to fill are generally relatively small/narrow, and the filler is thin enough that you don't use much, and if you need to, you use more than one coat. As with any kind of void-filling compound, always give the material plenty of time to dry/cure between coats. Like all finish work, you need gobs of time/patience to get good results.
Alder rarely needs filler, but Mahogany and similarly-grained woods can take maybe 3 passes before you're happy.
Alder rarely needs filler, but Mahogany and similarly-grained woods can take maybe 3 passes before you're happy.
Rick
Epic Member
- Messages
- 7,092
I'd use no grain filler on Alder, it's so smooth. On my current alder project I'm coming up with no grain marking and I'm in the buffing stage. I've used grain filler I bought at home depot on my swamp ash body tele. It was a pain to put on, put on, then sand, put on then sand, about 20 times before smooth. There has to be something better for mahogany. I don't know it though. I was probably using wood filler, and not grain filler.
JPOL007
Senior Member
- Messages
- 470
Thanks for the help. I have a Mahogany neck coming from Warmoth and saw where that wood needed to be grain filled.Cagey said:I've not seen one that is wood-specific, and few of them shrink any appreciable amount these days. It's not like wood filler or wall spackling - the voids grain filler is designed to fill are generally relatively small/narrow, and the filler is thin enough that you don't use much, and if you need to, you use more than one coat. As with any kind of void-filling compound, always give the material plenty of time to dry/cure between coats. Like all finish work, you need gobs of time/patience to get good results.
Alder rarely needs filler, but Mahogany and similarly-grained woods can take maybe 3 passes before you're happy.
JPOL007
Senior Member
- Messages
- 470
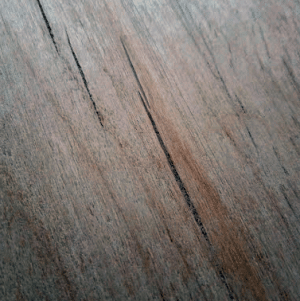
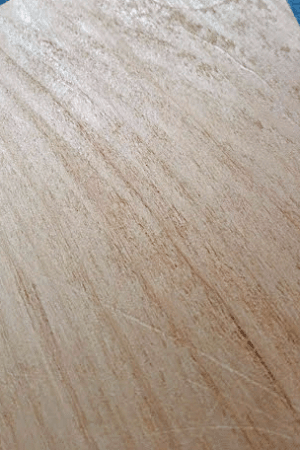
The Alder is smooth on one side (treble) and the (bass) side has some open lines running from top to bottom. I may be calling these line the wrong name. This Alder has what looks like flaming in Maple as part of the grain pattern. Kind of like the swirls in a finger print. Is that normal?Rick said:I'd use no grain filler on Alder, it's so smooth. On my current alder project I'm coming up with no grain marking and I'm in the buffing stage. I've used grain filler I bought at home depot on my swamp ash body tele. It was a pain to put on, put on, then sand, put on then sand, about 20 times before smooth. There has to be something better for mahogany. I don't know it though. I was probably using wood filler, and not grain filler.
Cagey
Mythical Status
- Messages
- 24,425
"Lines" implies they're straight, so I'd be sure they're not glue joints before filling them. If so, you might not even want to use that piece as is.
Grain can swirl, although it's pretty rare in Alder. But, all bets are off when it comes to wood grain. Mother nature has her own ideas about how things should look :laughing7:
Grain can swirl, although it's pretty rare in Alder. But, all bets are off when it comes to wood grain. Mother nature has her own ideas about how things should look :laughing7:
Rick
Epic Member
- Messages
- 7,092
Typically alder has what they call beauty marks and they are just part of the wood. They are like a mineral streak. They usually manifest themselves as a dark line. Sometimes you're lucky and you get a piece with chatoyance, and sometimes that might appear as a whorl. If you got a piece with some character like that you're lucky.
JPOL007
Senior Member
- Messages
- 470
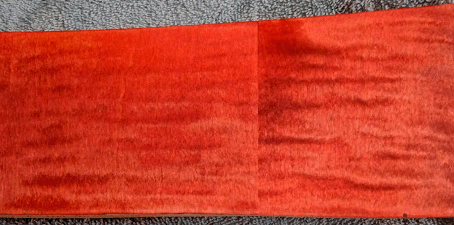
That is nice and these marks look like your beauty marks. The fingerprint pattern is just where the back has a lot more sanding to be done. The uneven spots give it the swirl look. I just didn't look at it very good when I got home from class last week. Here are some photos of the grain and a sample piece of the body I'm trying to dye. Any suggestions to help with the dye job would be greatly appreciated. I'm using TransTint; dye black and bright red. The sample has been dyed black then sanded back with 240 grit. The bright red was applied and let dry then sanded lightly with 240 grit. I applied another coat of bright red and let i dry overnight. There is a light spray coat (rattle can) of non-waxed shellac on top of the dye. The light area on the right of the photo worries me. Should it be darker or maybe i can add some yellow. I want the final product to be very glossy and as vivid as possible.Rick said:The beauty marks are the reason why I went with dye, rather than covering them up. They are something to be celebrated, not hidden.
Attachments
Rick
Epic Member
- Messages
- 7,092
My only advice is to go easy with with sanding between coats, after the dark base I use 400 grit and go very easy. Then follow with an easy rub of 0000 steel wool. Use a tack cloth and be super clean between coats wiping with naphtha to get all the dust. After tha t probably two coats of the lighter shade with only a gentle rub of 0000 steel wool between coats. Some use sanding pads rather than steel wool.
JPOL007
Senior Member
- Messages
- 470
Thanks Rick. Do you sand until only the low spots are highlighted after the black coat?Rick said:My only advice is to go easy with with sanding between coats, after the dark base I use 400 grit and go very easy. Then follow with an easy rub of 0000 steel wool. Use a tack cloth and be super clean between coats wiping with naphtha to get all the dust. After tha t probably two coats of the lighter shade with only a gentle rub of 0000 steel wool between coats. Some use sanding pads rather than steel wool.
AirCap
Hero Member
- Messages
- 1,003
My only advice is to go easy with with sanding between coats, after the dark base I use 400 grit and go very easy. Then follow with an easy rub of 0000 steel wool. Use a tack cloth and be super clean between coats wiping with naphtha to get all the dust. After tha t probably two coats of the lighter shade with only a gentle rub of 0000 steel wool between coats. Some use sanding pads rather than steel wool.
NEVER use steel wool. Use Scotchbrite. It doesn't rust, doesn't break down into little crumbs that hurt your fingers, and it isn't magnetic. The tiny bits get into EVERYTHING, and contaminate it. Steel wool is EVIL.
Rick
Epic Member
- Messages
- 7,092
It’s not so much low spots but rather features like birds eyes, chatoyance, tree rings etc . It’s a delicate balance between emphasizing the features while abraiding the spaces in between the features, as before go easy with sanding. I’ve found steel wool not to be an issue as long as I’m clean, wiping with naphtha and a tack cloth. Its less of an issue with dying because it’s not sticky.
JPOL007
Senior Member
- Messages
- 470
Sweet...I'll use more patience :icon_thumright:Thanks againRick said:It’s not so much low spots but rather features like birds eyes, chatoyance, tree rings etc . It’s a delicate balance between emphasizing the features while abraiding the spaces in between the features, as before go easy with sanding. I’ve found steel wool not to be an issue as long as I’m clean, wiping with naphtha and a tack cloth. Its less of an issue with dying because it’s not sticky.
Cagey
Mythical Status
- Messages
- 24,425
Hard rubber blocks (and other shapes) are your best friend when it comes to sanding for finish work. Trying to do it by just holding your abrasive by hand is asking for uneven results. Also, stay far, far away from steel wool. I don't even keep any in the house, so I'm not tempted.
JPOL007
Senior Member
- Messages
- 470
Cool... I invested pretty heavily in some hard rubber shapes when working in the Tele neck inlay project. I think I'll take this sample back down to bare wood. This will allow me to get the black heavier in the right places then work on the right amount of red in other areas. Might try some lemon yellow to cover any light spots red doesn't cover well. Thanks for the help :icon_thumright:Cagey said:Hard rubber blocks (and other shapes) are your best friend when it comes to sanding for finish work. Trying to do it by just holding your abrasive by hand is asking for uneven results. Also, stay far, far away from steel wool. I don't even keep any in the house, so I'm not tempted.
Similar threads
- Replies
- 4
- Views
- 1K
- Replies
- 4
- Views
- 2K


